Per què no ho preguntes?
Tens un projecte i vols saber què en pensen els teus col·laboradors? Vols saber per on van les reaccions dels teus lectors? Tens preguntes però no saps com fer-les arribar?
API d'enquestes
BrightSide llença el nou API per enquestes. Completament operatiu per a publicacions i dossiers, el nou API permet crear tantes enquestes associades com necessitis. Les enquestes poden ser consultades des de l'àrea d'usuari i enviades per correu.
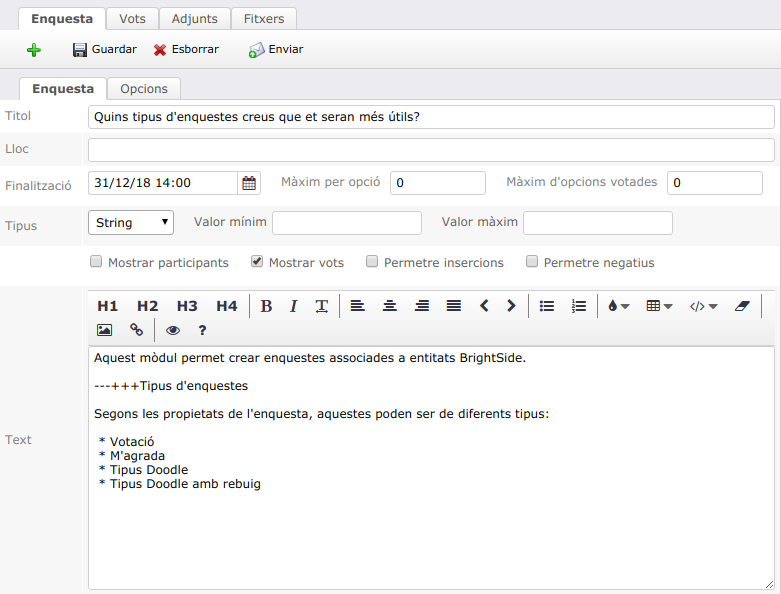
Detall de les propietats d'una enquesta
Pots trobar més informació a Enquestes.
El RGPD dins el servei BaaS
En una publicació anterior (Aplicant el Reglament general de protecció de dades) explicàvem com funciona el nou Agreements API i un exemple de com incorporar el RGPD. El que intentarem ara és explicar què veuen els teus usuaris i com saber l'estat de la seva signatura.
Els acords
Agreements API permet definir diferents tipus d'acords i el RGPD és només un dels tipus. Quan es crea un acord, l'usuari el revisa i pot acceptar o declinar, segons cregui convenient. Els acords poden ser necessaris per accedir als serveis o per rebre comunicacions. En aquest cas, és per rebre comunicacions.
Un usuari pot accedir a l'estat dels seus acords visitant Els meus acords. Si no estan signats, pot fer-ho també en aquest enllaç. Si estan signats, pot veure la data en que es va signar. Recordem que són acords entre el propietari del BaaS i els seus contactes.
Quan l'acord és necessari per a rebre notificacions, l'usuari rebrà un correu amb el text de l'acord i les opcions d'acceptar o declinar. Les notificacions no enviades quedaran en una cua d'enviament fins que accepti.
Què passa amb el RGPD?
El RGPD és un acord necessari per enviar notificacions i publicacions. Tot i que l'usuari pot controlar què rep dins Subscripcions, el reglament estableix que cal una confirmació abans no s'envií cap notificació.
L'avís de signatura del nou RGPD s'enviarà la primera vegada que l'usuari tingui una notificació pendent a la cua d'enviaments. Això funcionarà també per a nous usuaris.
Quan l'usuari s'hagi manifestat, les notificacions programades com Publicacions, Informe de dossiers, Informe de projectes, Els meus temes i similars, quedaran bloquejades si ha declinat l'acord. Els correus que no es veuen afectats són:
- Correus de les botigues on-line. Els vostres usuaris podran continuar comprant.
- Tickets d'incidències en serveis i activitat general entre informants i responsables.
- Recuperacions de password.
- Correus d'enviament de factures.
El que vindrà...
L'Agreements API obre la possibilitat de crear unes condicions d'us del servei i privacitat estàndards, simplement canviant el tipus d'acord.
Hi tornem en breu 
Aplicant el Reglament general de protecció de dades
El nou reglament de protecció de dades ens facilita molt la possibilitat de mantenir arxius amb dades dels nostres usuaris. Però també introdueix un nombre de responsabilitats que cal adreçar. Elephant ho posa fàcil.
Agreements API, la solució integrada
Per saber com crear manualment un acord compatible amb el nou RGPD, veieu Agreements.
Per tenir una solució fàcil, per defecte s'inclou un acord compatible amb el nou reglament i que podreu veure al final d'aquest escrit. Per modificacions al text, contacteu amb suport@turro.org.
Aquest s'enviarà a tots els usuaris amb subscripcions actives, permetent acceptar el RGPD des del mateix correu. Tots aquells usuaris que no acceptin explícitament el reglament, deixaran de rebre de les seves subscripcions.
Amés, el sistema funciona igualment per a nous usuaris i noves reglamentacions que vagin apareixent.
Quins correus no es veuen afectats?
Alguns dels correus que envia Elephant i els mòduls BrightSide no es veuen afectats pel RGPD. Aquests són:
- Correus de les botigues on-line. Els vostres usuaris podran continuar comprant.
- Tickets d'incidències en serveis i activitat general entre informants i responsables.
- Recuperacions de password.
- Correus d'enviament de factures.
El text estàndard
Reglament general de protecció de dades
El Reglament (UE) 2016/679 del Parlament Europeu i del Consell de 27 d'abril de 2016 (RGPD) comporta que:
- El Responsable del Tractament de les teves dades personals és [nom del lloc].
- La finalitat del tractament de les dades personals és la de gestionar la teva vinculació amb [nom del lloc].
- Les teves dades no seran comunicades a tercers sense previ consentiment, així com tampoc es produiran transferències a tercers països o organitzacions internacionals.
- Pots exercir els drets d'accés, rectificació, supressió, oposició, limitació en el tractament i portabilitat segons es preveu a la norma.
Acceptes rebre informació des de [nom del lloc]?
El text acaba amb dos botons d'opció: Acceptar o Declinar.
Elephant introduces the Sendable attribute, plenty to discover
Next Elephant update will include Sendable attributes for some entities. Knowing that those entities already were sent to subscribers / attendees, why introducing a new API?
Sendable, what and why
Sendable has two main attributes, schedule and sent. schedule is a date and time field, representing when the entity should be sent. sent is set to TRUE when the entity has been sent. Sendable has also a list of SendableAssistant. The function of this list is the possibility to add recipients when sending.
Sendable was mainly added to schedule sending a Convocation. When programming a convocation, the assistant list is replaced by the convocation list of attendees.
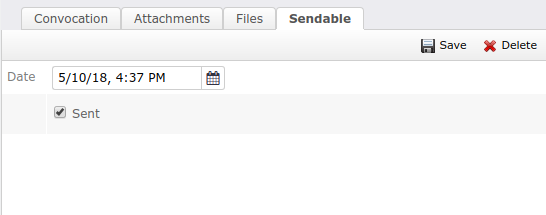
Sendable attributes for a convocation.
Sendable on publications
Publications already have a sending method that suits perfectly for most cases. We should we use Sendable when we have a private category publication, with an always varying number of subscribers. We can keep the category with no subscribers and use Sendable assistants instead.
Differences between category sending method and Sendable
|
Category |
Sendable |
|
Mail subject is category related, since the message body can contain more than one publication. |
Mail subject is the publication title. |
|
Recipients are controlled by the category. |
Recipients are Sendable assistants, unique for this publication. |
|
The mail queue controls when publication are sent, taking into account user options when public. |
The mail is sent as state in |
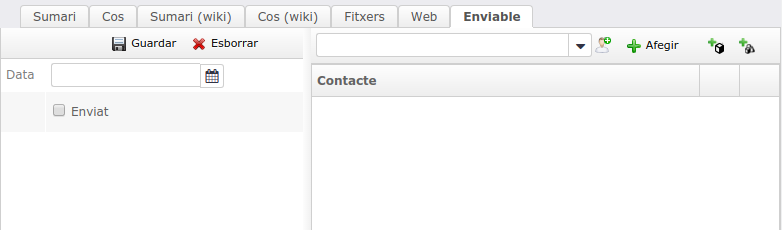
Sendable attributes for a publication.
To make these differences more effective, category subscribers aren't included in Sendable assistants.
How it works?
Sendable depends on the Elephant Mail Queue task, concretely with the ON_GENERATED option. Every time it checks for queue messages does check for Sendable past due. For normal configurations, nothing needs to be done.
What comes next
Sendable will be included in more entities and we'll be listening to user feedback. Keep connected!
Tomcat virtual hosting with SSL
This 2018 I needed to install an SSL Certificate for a web application. Since Tomcat 9 features virtual hosted web application with differentiated SSL hosts, the next step were easy to guess: move to Java 10 plus Tomcat 9 and make use of these new features. This article goes about the process to its final ending, this web site.
First issues when migrating
Java 9 and above no longer include JAXB. Simply add the JAXB library to Tomcat 9.
Tomcat 9 no longer put the final slash to the URL (does not redirect). Modify conf/context.xml to include mapper attributes:
<Context ...
	 mapperContextRootRedirectEnabled="true"
	 mapperDirectoryRedirectEnabled="true"/>
Requirements
- Tomcat 9, although I've been told 8.5 also supported SSL host virtualization.
- Java 8 or higher. This example has been tested with Java 10.
Elements used for this article
- This web site, an open source web application.
- A Comodo Essential Certificate.
- A full weekend
Asking for the certificate
If you already have a certificate you may want to skip this part. Otherwise, buy a certificate and continue.
First thing the provider ask for is a Certificate Signing Request. Lets generate one:
openssl req -new -newkey rsa:2048 -nodes -out [yourdomain].csr -keyout [yourdomain].key -subj "/C=[country]/ST=[state]/L=[city]/O=[organization]/OU=[department]/CN=[domain]"
|
Field |
Description |
|
yourdomain |
This will be the file name. For example www_domain_whatever, in my case |
|
country |
Two uppercase letters of your country, see ISO 3166-1. |
|
state |
Your state or province, as is. |
|
city |
Your city. |
|
organization |
Your organization name. |
|
department |
Department managing de certificate. |
|
domain |
As for Comodo Essential, the domain will apply to Recomendation: use |
Once executed, this command generated two files, yourdomain.csr and yourdomain.key. The CSR file is the Certificate Signing Request, and is the first thing you will need to provide when asking your certificate. The second is the Private Key. Keep them both in a secure place.
Installing the certificate into a keystore
If everything has gone well, you now have a response from the Certification Provider and some certificates in you hard disk. Copy them where you saved previous generated files, CSR and private key. If you followed the instructions, you private key is stored in [yourdomain].key file.
Now, one of the certificates you received is your certificate. The rest are called root certificate and chain certificates.
Change to convenient format
First thing we'll do is convert your private key and your certificate to PKCS12 format. Don't bother now as to why we use this format, I want a single keystore to include the whole bunch of certificates to simplify Tomcat configuration, and it turns out that Tomcat NIO likes this format. So, have it.
openssl pkcs12 -export -in [yourcertificate] -inkey [yourdomain].key -name [yourdomain] -out [yourdomain].p12
|
Field |
Description |
|
yourcertificate |
Your certificate is one of those the certification provider sent you. As for Comodo, my certificate was |
|
yourdomain |
This will be the file name. For example www_domain_whatever, in my case |
Import private key and certificates into the keystore
This step creates a new keystore file.
keytool -importkeystore -destkeypass [password] -destkeystore [yourdomain].keystore -srckeystore [yourdomain].p12 -srcstoretype PKCS12 -srcstorepass [password]
Now, add the root and chain certificates. Bellow the example with Comodo certificates. You may follow instructions provided for your own certificate provider. Notice that the only pattern used is alias equal to certificate file minus extension.
keytool -import -trustcacerts -alias AddTrustExternalCARoot -file AddTrustExternalCARoot.crt -keystore [yourdomain].keystore
keytool -import -trustcacerts -alias COMODORSAAddTrustCA -file COMODORSAAddTrustCA.crt -keystore [yourdomain].keystore
keytool -import -trustcacerts -alias COMODORSADomainValidationSecureServerCA -file COMODORSADomainValidationSecureServerCA.crt -keystore [yourdomain].keystore
If you followed the instructions, you have a keystore named [yourdomain].keystore with everything required by Tomcat.
Installing the keystore
Let's explain something about Tomcat. Tomcat has a single Connector for SSL configuration. Once you configure your keystore, it will be available by all the web application installed, but will only certificate your domain. So, where SSL hosting virtualization is?
Don't panic, there is SSL hosting virtualization. You achieve the goal by creating SSLHostConfig elements with hostName attribute set to match one of the Host elements its name attribute. One of them will need to be the defaultSSLHostConfigName attribute in the Connector element. Messy? See the server.xml example with the values we used:
<Connector port="443" protocol="org.apache.coyote.http11.Http11NioProtocol"
           maxThreads="150"
           SSLEnabled="true"
           scheme="https"
           secure="true"
           defaultSSLHostConfigName="[domain]"

           ...

           >
    <SSLHostConfig hostName="[domain]">
        <Certificate certificateKeystoreFile="[yourdomain].keystore"
                     certificateKeystorePassword="[password]"/>
    </SSLHostConfig>

    ....

</Connector>

...

<Engine name="Catalina" defaultHost="[domain]">

  <Host name="[domain]"  appBase="/anyfolder"
        unpackWARs="false" autoDeploy="false">
  </Host>

  ...

</Engine>
Let's suppose we followed the steps with [domain2] values. The server.xml will look like:
<Connector port="443" protocol="org.apache.coyote.http11.Http11NioProtocol"
           maxThreads="150"
           SSLEnabled="true"
           scheme="https"
           secure="true"
           defaultSSLHostConfigName="[domain]"

           ...

           >
    <SSLHostConfig hostName="[domain]">
        <Certificate certificateKeystoreFile="[yourdomain].keystore"
                     certificateKeystorePassword="[password]"/>
    </SSLHostConfig>

    <SSLHostConfig hostName="[domain2]">
        <Certificate certificateKeystoreFile="[yourdomain2].keystore"
                     certificateKeystorePassword="[password2]"/>
    </SSLHostConfig>

    ....

</Connector>

...

<Engine name="Catalina" defaultHost="[domain]">

  <Host name="[domain]"  appBase="/anyfolder"
        unpackWARs="false" autoDeploy="false">
  </Host>

  <Host name="[domain2]"  appBase="/anyfolder2"
        unpackWARs="false" autoDeploy="false">
  </Host>

  ...

</Engine>
Now everything is more clear. [domain] is the default SSL configuration, but when somebody visits [domain2] there is a match between SSLHostConfig its hostName attribute and Host its name attribute. Thus, [yourdomain2].keystore will be used.
Restart your Tomcat and... That's all!