Regressió detectada en tipus especials de documents
Aquesta regressió afecta contractes del tipus intra-comunitari.
El valor del IVA
Els contractes intra-comunitaris generen dues entrades d'IVA, una de suportat i una de repercutit. Ambdues s'anul·len i deixen el total del document igual a la seva base imposable. Aquest és el reglament actual de l'IVA per aquest tipus de contracte.
Des del passat dilluns, 1/6/2015, els documents d'aquest tipus no han generat entrades d'IVA. No és evident perquè el total del document és correcte, igual a la base imposable, però queda constància en l'assentament.
La correcció
La regressió ha estat detectada en el moment d'aquesta nota, 3/6/2015, i serà corregida abans de les 8h del matí del 4/6/2015.
Què fer si ja he entrat algun document intra-comunitari?
Caldrà obrir el document i re-gravar-lo. Amb aquesta acció es generaran els apunts i registres d'IVA necessaris.
Per qualsevol dubte podeu contactar usant la pàgina de suport.
Lamentem qualsevol inconvenient que aquest fet hagi pogut causar.
Els temes augmenten el detall a hores, primera aproximació
La darrera versió de BrightSide Dossiers arriba amb canvis importants. La majoria són millores que no afecten el pla de treball. Fulls de treball que sobre-escriuen els temes assignats a un usuari, visors per defecte a la web dels plans de treball, visors per defecte de les bases documentals associades a dossiers.
Les hores, un canvi a tenir en compte
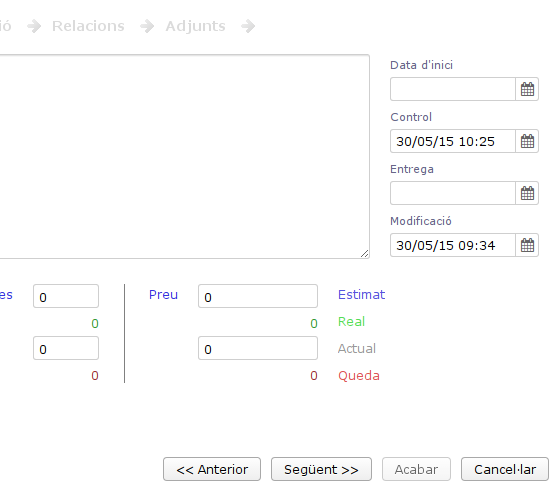
Fins ara, quan donàvem una data d'inici, de control o d'entrega a un tema, es veia en els calendaris associat al dia i, per defecte, posat a les 8:00h. El mateix que passa amb l'avís dels temes assignats.
Les hores introdueixen un canvi important en els calendaris. En la nova versió, el tema es col·locarà en l'hora i minuts donats al afegir informació.
Més informació a donar
Un inconvenient clar pels habituats a donar dates de control és el fet d'haver d'introduir més informació. Per entendre la profunditat dels canvis, fixem-nos en l'informe rebut per correu dels temes assignats. Fins les versions anteriors no tenia cap importància l'hora de generació, donat que les dates de control es relacionaven amb el dia. Ara, si la data de control és posterior en l'hora, no sortirà al informe com a data sobrepassada.
El possible inconvenient en les dates de control és, en canvi, un gran avantatge en les dates d'inici i d'entrega. Ara és possible mostrar en els calendaris, tant l'intern com els exportats a altres entorns, el moment exacte en que es produeix en canvi d'estat del tema.
Molt aviat en el teu Cloud BaaS.
El servidor Cloud del servei BAAS pot restar aturat per un període màxim de dues hores els propers dies
Degut a una vulnerabilitat trobada en les eines Xen (XEN-133) es realitzarà una actualització en el seu Cloud BAAS.
El moment de l'actualització es determinarà poc abans d'iniciar-la i es farà de manera controlada, aturant i re-iniciant el Cloud. Aquesta aturada serà per un període màxim de dues hores. El seu Cloud BAAS realitza còpies de seguretat diàries, pel que no haurà de preocupar-se per la integritat de les seves dades.
Si vol tenir més informació respecte el problema detectat, vegi http://xenbits.xen.org/xsa/advisory-133.html.
Gràcies per la comprensió i disculpeu qualsevol molèstia que puguem causar.
Creating a wiki editor using ZK, based on the original Elephant-Wiki component
It was 2008 and I needed a wiki editor for Elephant-Wiki syntax. The JavaScript source code can be located here editor.txt. For those interested, there is a wiki-bar, coded into a JSP file, which was sensible of caret position as to interact with the user. The code, conveniently renamed to TXT, is here wikiBar.txt
Was quite an effort and never since I have been able to find time to improve it.
Turning to ZK7
Early this year, 2015, BrightSide migrated from ZK6 to ZK7. As usual, guys at Potix had made a great work. ZK7 is fast, slim and a good looking piece of software. Could it be the moment to give a close review to Elephant-Wiki editor?
First requirements
Before trying to write an editor, you have to make sure you'll have what it needs to start with.
- Caret position
- Editor content's value
- Ability to change this content
You might find this list really short for what I'm pretending to do. What about the events, moving data from client to server and so on? Here is where ZK makes difference. I'm not worried at all. 
Caret position
Let's use a simple Textbox for our editor. By default, Textbox does not inform of where the caret is. Thus, we are going to use a trick that was first pointed at ZK forums. Transform a JavaScript event into a ZK event and pass through selection values. That is, selection start and selection end. When both values are the same, there is the caret position. When values differ, then they point to selected text.
wikibox.setWidgetListener("onBlur", "zAu.send(new zk.Event(this," onCaret" ,zk(this.$n()).getSelectionRange()+" " ,{toServer:true}));");
This example uses the onBlur event to send an onCaret to ZK Textbox component. The event's data is the selection range. The string has this format "selectionStart,selectionEnd", for example "0,0".
On the server side, we need a listener for the onCaret event.
@Listen("onCaret = *")
public void onCaret(Event event) {
  String v[] = ((String) event.getData()).split(",");
  selectionStart = Integer.valueOf(v[0]);
  selectionEnd = Integer.valueOf(v[1]);
}
The example uses two variables to store selection range for future uses.
Dealing with editor's value
Textbox component has methods that will make things really easy. To ensure the example interesting we'll suppose the user has clicked on the Bold button and wiki syntax for bold text is to surround the value with double asterisk. The example uses wikibox variable as the Textbox component.
@Listen("onClick = #bold")
public void onBold() {
  wikibox.setSelectedText(selectionStart, selectionStart, "**", false);
  selectionStart += "**".length();
  selectionEnd += "**".length();
  wikibox.setSelectedText(selectionEnd, selectionEnd, "**", false);
  wikibox.setSelectionRange(selectionStart, selectionStart);
  wikibox.setFocus(true);
  Events.postEvent(new InputEvent("onChange", this, wikibox.getValue(), null));
}
If there is no text selected, the text " will be inserted, with caret positioned exactly in the middle, as to start typing. If some text is selected, the result will be this text surrounded by double asterisk, as in ".
Looking at the code, line by line, the setSelectedText method, inserts " at selection range's start. Then increases variables so they point to the same location at text. The next setSelectedText inserts " at selection range's end. If there was no text selected, then the four asterisk will stay together, otherwise will surround the selection. Calling setSelectionRange method ensures the caret position will be exactly after the first two asterisk. The method setFocus, as it reads, put focus on the editor. Last line posts an onChange event, to inform composer that something in editor has changed.
Let's write the component
In order to give an appearance to our editor we need some zul code and wrap the above examples into a class. We start with the zul code at file wikiInput.zul.
<zk>
  <menubar>
    <menuitem id="bold" iconSclass="z-icon-bold"/>
  </menubar>
  <textbox id="wikibox" multiline="true" tabbable="true" style="-moz-tab-size:4;-o-tab-size:4;tab-size:4;width:100%;height:100%;"/>
</zk>
The code is quite simple. The reason why I prefer a menubar instead of a toolbar will be more evident when you see the real-world example. For now, it makes no difference what the bold element is. The important things to remember are the id attributes, which are wired to ZK components in the Java class at server-side.
See now the Java class WikiEditor.
public class WikiEditor extends Div implements IdSpace { private int selectionStart, selectionEnd; @Wire private Textbox wikibox; public WikiEditor() { Executions.createComponents("/WEB-INF/_zul/comps/editor/wikiInput.zul", this, null); Selectors.wireComponents(this, this, false); Selectors.wireEventListeners(this, this); wikibox.setWidgetListener("onBlur", "zAu.send(new zk.Event(this," onCaret" ,zk(this.$n()).getSelectionRange()+" " ,{toServer:true}));"); wikibox.addEventListener(Events.ON_CHANGE, new EventListener() { @Override public void onEvent(InputEvent event) throws Exception { Events.postEvent(WikiEditor.this, event); } }); } @Listen("onClick = #bold") public void onBold() { wikibox.setSelectedText(selectionStart, selectionStart, "**", false); selectionStart += "**".length(); selectionEnd += "**".length(); wikibox.setSelectedText(selectionEnd, selectionEnd, "**", false); wikibox.setSelectionRange(selectionStart, selectionStart); wikibox.setFocus(true); Events.postEvent(new InputEvent("onChange", this, wikibox.getValue(), null)); } }
The magic of making Java class aware of zul code is performed in the first three lines of the constructor. Notice that we indicate where to find the zul file in the createComponents method.
Using the component in zul pages
Now you can put the component in your zul pages like this, changing the package org.turro for this where you put the class.
<div width="100%" height="100%" use="org.turro.WikiEditor"/>
Real-world component
As promised, here is the real-world zul page.
<zk> <style> .font14px * { font-size: 14px; } .fontBold * { font-weight: bold; } </style> <menubar sclass="font14px"> <menuitem id="header1" label="H1" class="fontBold"/> <menuitem id="header2" label="H2" class="fontBold"/> <menuitem id="header3" label="H3" class="fontBold"/> <menuitem id="header4" label="H4" class="fontBold"/><menuitem id="bold" iconSclass="z-icon-bold"/> <menuitem id="italic" iconSclass="z-icon-italic"/> <menuitem id="regular" iconSclass="z-icon-text-width"/> <menuitem id="alignleft" iconSclass="z-icon-align-left"/> <menuitem id="aligncenter" iconSclass="z-icon-align-center"/> <menuitem id="alignright" iconSclass="z-icon-align-right"/> <menuitem id="alignjustify" iconSclass="z-icon-align-justify"/> <menuitem id="floatleft" iconSclass="z-icon-chevron-left"/> <menuitem id="floatright" iconSclass="z-icon-chevron-right"/> <menuitem id="ullist" iconSclass="z-icon-list-ul"/> <menuitem id="ollist" iconSclass="z-icon-list-ol"/> <menu iconSclass="z-icon-tint"> <menupopup> <menu id="color" content="#color=#333333" label="${el_label['wbar.color']}"/> <menu id="background" content="#color=#ffffff" label="${el_label['wbar.background']}"/> </menupopup> </menu> <menu iconSclass="z-icon-table"> <menupopup> <menuitem id="thl" label="${el_label['wbar.newheader']}: ${el_label['wbar.left']}"/> <menuitem id="thr" label="${el_label['wbar.newheader']}: ${el_label['wbar.right']}"/> <menuitem id="trl" label="${el_label['wbar.newrow']}: ${el_label['wbar.left']}"/> <menuitem id="trr" label="${el_label['wbar.newrow']}: ${el_label['wbar.right']}"/> <menuitem id="tcl" label="${el_label['wbar.newcolumn']}: ${el_label['wbar.left']}"/> <menuitem id="tcr" label="${el_label['wbar.newcolumn']}: ${el_label['wbar.right']}"/> <menuitem id="tet" label="${el_label['wbar.endtable']}"/> </menupopup> </menu> <menu iconSclass="z-icon-code"> <menupopup> <menuitem id="block" label="${el_label['wbar.createblock']}"/> <menuitem id="span" label="${el_label['wbar.createspan']}"/> <menuitem id="note" label="${el_label['wbar.createnote']}"/> <menuitem id="startcolumn" label="${el_label['wbar.addcolumn']}"/> <menuitem id="endcolumns" label="${el_label['wbar.endcolumns']}"/> <menuitem id="tabulator" label="${el_label['wbar.createtabulator']}"/> <menuitem id="blind" label="${el_label['wbar.createblind']}"/> <menu label="Wiki syntax"> <menupopup> <menuitem id="startwiki" label="${el_label.lStart}"/> <menuitem id="stopwiki" label="${el_label.lStop}"/> </menupopup> </menu> <menu label="Java syntax"> <menupopup> <menuitem id="startjava" label="${el_label.lStart}"/> <menuitem id="stopjava" label="${el_label.lStop}"/> </menupopup> </menu> <menu label="XML syntax"> <menupopup> <menuitem id="startxml" label="${el_label.lStart}"/> <menuitem id="stopxml" label="${el_label.lStop}"/> </menupopup> </menu> </menupopup> </menu> <menuitem id="eraser" iconSclass="z-icon-eraser"/> <menuitem id="image" iconSclass="z-icon-picture-o"/> <menuitem id="link" iconSclass="z-icon-link"/> <menuitem id="preview" iconSclass="z-icon-eye"/> </menubar> <textbox id="wikibox" multiline="true" tabbable="true" style="-moz-tab-size:4;-o-tab-size:4;tab-size:4;width:100%;height:100%;"/> </zk>
Java source code (update 26/04/2015)
WikiEditor.java
WikiElement.java
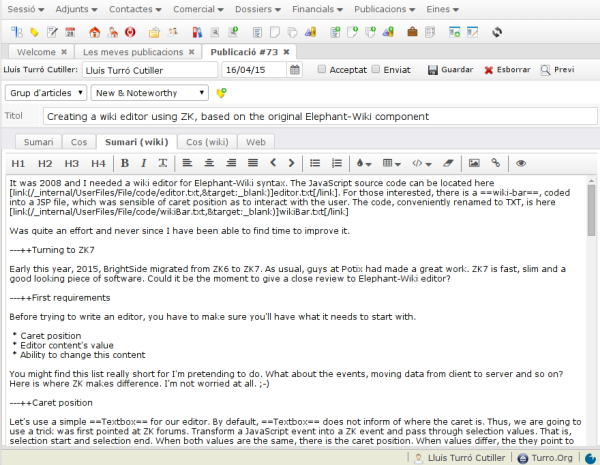
And finally, the editor while writing this blog.
Creant un publicació amb un arxiu de descàrrega usant Elephant-Wiki
La nova barra d'eines de l'editor Elephant-Wiki permet enllaçar directament arxius a les publicacions. Les passes a fer són ben senzilles.
Crear una nova publicació i editar-la des de la pestanya Sumari (wiki)
L'editor WYSIWYG permet també afegir enllaços, però algunes de les característiques que ara veurem només són vàlides des d'aquesta pestanya.
Creant l'enllaç a l'arxiu
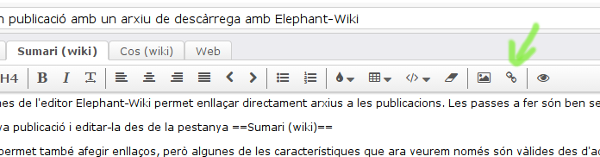
Hi han dos accessos al repositori, un per imatges i l'altre per arxius. El d'imatges només mostra arxius amb extensions d'imatge. Per enllaçar un arxiu usarem el botó d'enllaç.
Ens apareix un diàleg on es demana on apunta l'enllaç i quin text volem mostrar. Abans d'omplir res, marcarem sobre Enllaçar arxiu.

S'obrirà el navegador i pujarem l'arxiu al Cloud BaaS. Un cop pujat el seleccionarem.
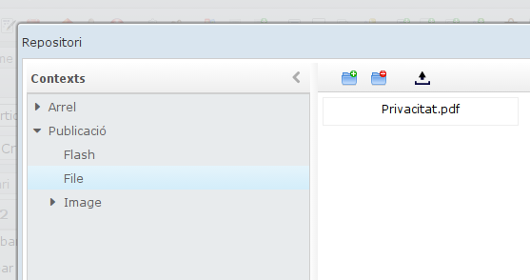
Com a resultat, els camps del diàleg s'ompliran amb les dades de la selecció. Per afinar en el resultat, li direm que l'enllaç apunta a una nova pestanya i li aplicarem un estil. En l'exemple, softButton.
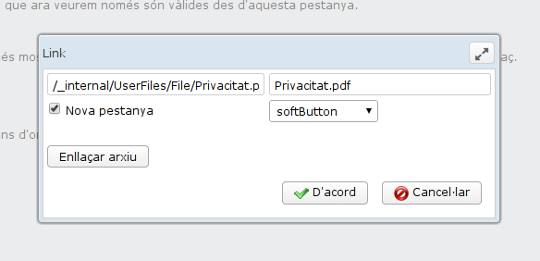
El resultat és aquest botó, clicable tant des de la web com des dels emails que envia el programa als subscriptors.
Privacitat.pdfFàcil, oi?